How to Rip Jeans and Leave the White Thread (2025 DIY Guide)
What Are Ripped Jeans? The Trend Explained
Blog Contents
- What Are Ripped Jeans? The Trend Explained
- Why the White Threads? Unlocking the Secret of Denim
- Tools & Materials Checklist
- Step-by-Step: How to Rip Jeans and Leave the White Thread
- Pro-Tips for Next-Level Distressing
- Freqently Ask Question
- Pro Styling Ideas: How to Rock Your Custom Ripped Jeans
- Your Turn to Create!

Ripped jeans are denim’s rebellious streak! These iconic jeans feature intentional tears, frays, or distressed spots, giving them an edgy, lived-in look. While workers once wore torn denim, everything changed in the 70s and 80s, when punk and grunge icons—think Kurt Cobain—turned ripped jeans into a bold fashion statement.
Fast-forward to today, and ripped jeans have exploded into a top style trend for all fashion lovers. Before you start, make sure you’re working with comfortable denim. If your pair is a bit rigid, our guide on how to soften stiff, thick jeans can help. Ultimately,
Why the White Threads? Unlocking the Secret of Denim
Spotting those eye-catching white threads peeking out from ripped jeans? That’s DIY denim magic! In fact, leaving the white horizontal threads intact after you cut or tear jeans instantly boosts the contrast and gives your denim a super-authentic, distressed look. It’s a trick every fashion-forward creative swears by, because those white threads make rips pop—giving your jeans that runway-worthy, custom edge.
Before we break out the tools, let’s talk about why this works. It’s not magic—it’s just how manufacturers make denim! To create denim, they weave a grid of threads together.
- Manufacturers dye the vertical threads (called the “warp”) that classic indigo blue.
- They leave the horizontal threads (called the “weft”) natural and white.
For instance, when you see a professionally done rip, you’re looking at the intact white weft threads running across the opening where you have removed the blue warp threads. Our mission, therefore, is to carefully cut the fabric and literally pull out the vertical blue threads, leaving the white threads behind to create that awesome, web-like effect. Once you understand this, the whole process becomes super easy.
Tools & Materials Checklist
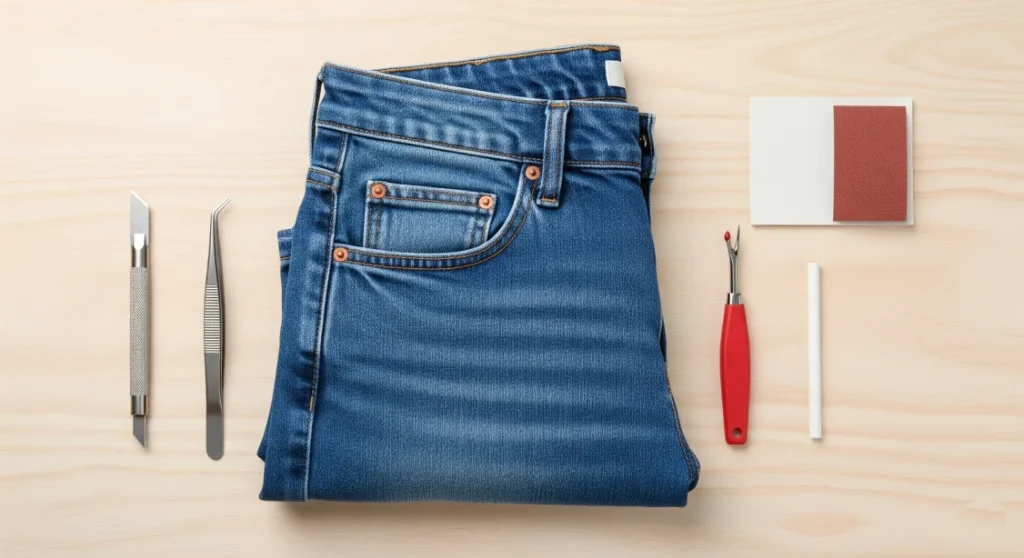
Ready to get crafty? Here’s what you’ll need to create perfectly ripped jeans with those bright white threads shining through:
- Seam ripper (for precise blue thread removal)
- Tweezers (grab and pull blue threads with ease)
- Sharp tool: razor, knife, or sturdy scissors (for starting your rips)
- Pumice stone or nail file (for a soft, realistic frayed edge)
- Fabric chalk or washable marker (to map out your DIY design)
- Cutting board or thick book (to protect the other side of your jeans)
- Sandpaper or cheese grater (optional, for extra distressing texture)
- Optional: Protective gloves & a mask (if you’re sensitive to denim dust)
Pro Tip: Want that 80s-style or grunge-inspired look? In that case, experiment with a mix of tools and see which ripped jeans technique fits your vibe!
Step-by-Step: How to Rip Jeans and Leave the White Thread
Step 1: Pick Your Spot & Mark It Up

First things first, decide where you want your rips. A classic spot is right around the knees, but thighs and back pockets also work great. To get the placement just right, put the jeans on!
Then, stand in front of a mirror and use your fabric chalk or a pencil to mark the area where you want the rip to be. Draw two horizontal lines to mark the top and bottom boundaries of your rip. A rip that’s 1-2 inches tall is a great starting point. Keep in mind, you can always make the hole bigger, but you can’t make it smaller, so it’s best to start conservatively. (And if a rip ever goes too far, don’t worry—you can learn how to fix ripped jeans with our other guide!) Above all, take your time with this step!
Step 2: Make Your Parallel Cuts
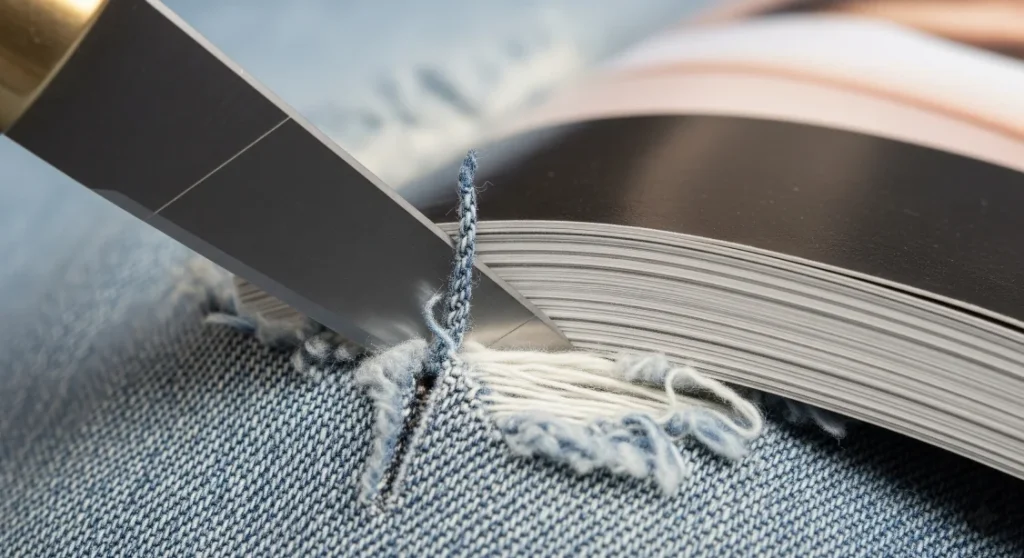
Next, take your jeans off and lay them flat. Now, slide that wooden block or thick magazine inside the pant leg directly under the area you marked. This is a pro-tip to prevent you from slicing right through to the back of the jeans!
From there, using your craft knife or scissors, carefully make horizontal cuts running from one side of your marked area to the other. Make several cuts between your top and bottom boundary lines, spacing them about half an inch to an inch apart. It’s important that you only cut horizontally. Otherwise, you won’t be able to achieve the desired effect.
Step 3: The Big Reveal – Pulling the Blue Threads
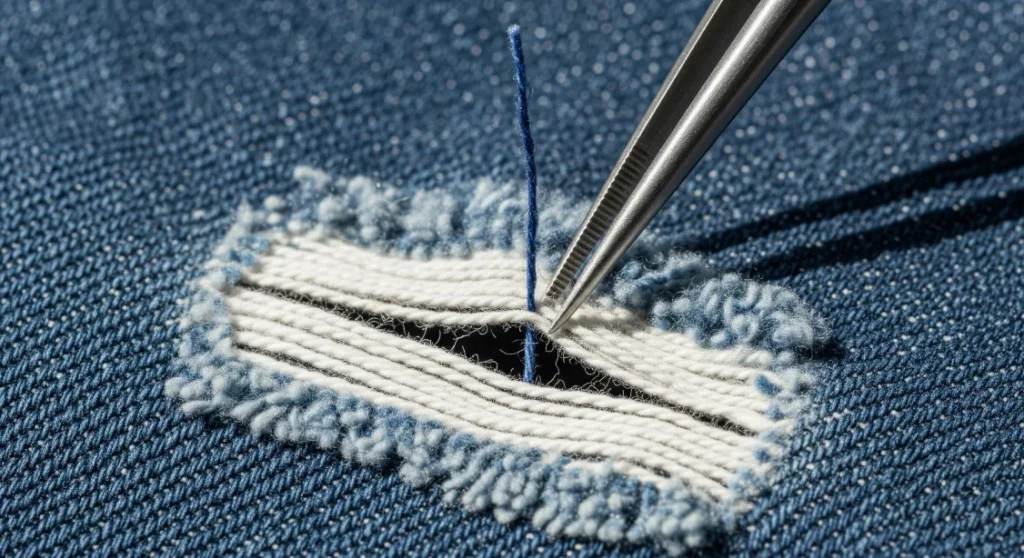
Now, this is where your patience pays off, and the look comes to life. Grab your tweezers! Start at the edge of one of your cuts and begin to pluck out the short, vertical blue threads (the warp threads we talked about). As you do this, you’ll see the horizontal white threads (the weft) remain.
Your goal is to use the tweezers to remove all the vertical blue threads between the top and bottom cuts of your ripped area. Admittedly, it can be a little slow at first, but you’ll get into a rhythm. Pull them out one by one or in small clumps. As a result, that awesome white-threaded grid will appear. This is the secret to making a ripped hole look authentic!
Step 4: Distressing and Fraying for a Trendy Finish
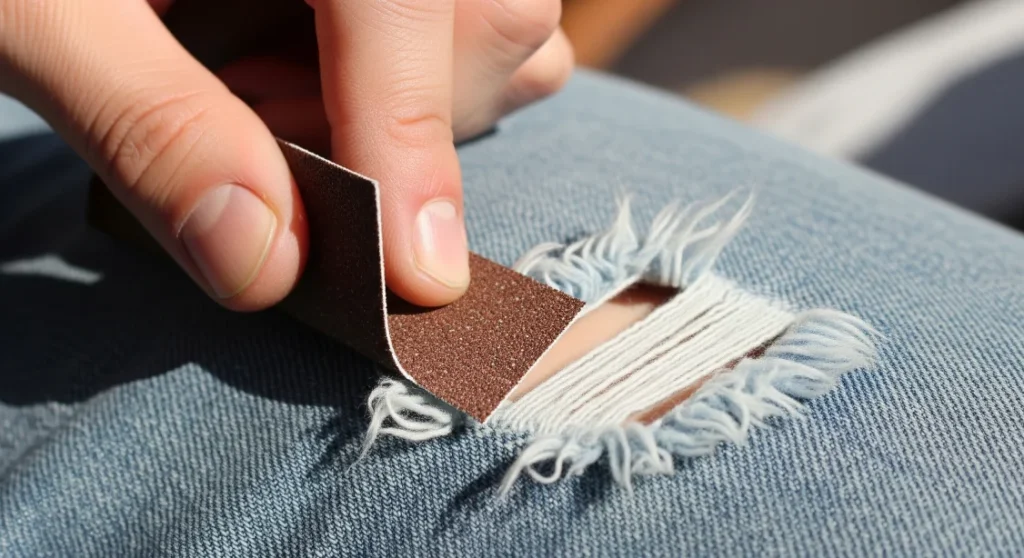
While a clean rip is cool, a little fraying gives you that truly authentic, worn-in feel. Now that your white threads are exposed, it’s time to rough things up a bit. This is how you achieve the perfect distressed look while maintaining the structure of your rip.
To do this, grab your sandpaper, pumice stone, or nail file. Gently rub the edges of your cuts and the area immediately surrounding the hole. This will soften the hard edges and start to fray holes in your jeans naturally. Additionally, you can also scuff up the pockets, hems, and belt loops to make the distressing look more consistent across the whole pair of jeans. Don’t go too hard—a little goes a long way!
Step 5: Wash and Wear!

Finally, you’re so close! The last step is to give your newly customized jeans a wash. Toss them in the washing machine on a normal cycle and then dry them. This is the secret ingredient that makes the rips look totally natural.
The machine wash will cause the edges you sanded to fray perfectly, blooming the threads and softening the entire ripped area. In other words, it helps all your hard work settle into the fabric for a genuine, worn-in look. After that, once they’re dry, they are officially ready to rock. You did it!
Pro-Tips for Next-Level Distressing
Feeling confident? Moreover, if you want to take your distressing jeans game even further, try these techniques.
- The Razor Shave: For example, for a super-soft, fuzzy distressed patch instead of a full hole, gently “shave” an area of your denim with a sharp disposable razor. This thins the fabric and creates a unique, worn-in texture without going all the way through.
- Add a Backing Patch: In addition, for a pop of color or pattern, you can sew around the inside of your rip with a cool fabric patch (like plaid or floral). This reinforces the hole and adds a custom design element.
- Targeted Bleach: Likewise, for a faded, sun-kissed look around your rips, apply a small amount of bleach with a paintbrush or Q-tip and let it sit for a few minutes before washing. Use this sparingly and in a well-ventilated area!
Freqently Ask Question
How do I rip jeans and leave the white thread at home?
A: First, mark the area you want to rip and make horizontal cuts through just the top layer. Then, use a seam ripper or tweezers to carefully pull out the blue threads between the cuts. Don’t touch the white horizontal threads—this is what gives that signature look!
What tool is best for ripping jeans?
A: Generally, a sharp seam ripper or tweezers are best for removing threads, and a razor or sturdy scissors are ideal for starting the rip. Many pros also love using a pumice stone or nail file for a softer fray.
How do you fray jeans quickly? (With or without sandpaper)
A: For quick fraying, rub the ripped edges with sandpaper, a pumice stone, or a nail file. For the most natural look, however, wash your jeans after distressing—frayed magic!
What grit of sandpaper works best for fading jeans?
A: Medium grit (around 120–180) is ideal for softening and distressing denim without shredding it completely.
How do I rip black jeans and leave the white thread?
A: You follow the same steps as for blue denim! However, black jeans reveal pale or grayish threads, which creates a cool, two-tone distressed effect.
Can I use iron-on patches on ripped jeans? Will they last?
A: Iron-on patches work great for reinforcing thin areas or customizing your look. For spots under lots of stretch, though, try sewing patches instead—they’ll be more durable in the long run.
Are frayed jeans still in style in 2025?
A: Absolutely! Ripped and frayed denim remains a top trend, especially with custom rips and visible white threads.
How do I care for my ripped or frayed jeans?
A: To properly care for them, wash on a gentle cycle (inside out), avoid harsh detergents, and air-dry when possible. You can also use a mesh laundry bag to keep distressed details fresh.
What did Kurt Cobain wear? (Denim inspo!)
A: We remember Kurt Cobain for his ultra-distressed, DIY-style ripped jeans—specifically, loose-fitting denim, sometimes with big, dramatic holes. Go grunge and make it your own!
Pro Styling Ideas: How to Rock Your Custom Ripped Jeans
You’ve finished your DIY masterpiece—now what? Here’s how to style your one-of-a-kind ripped jeans with serious style:
- Casual Cool: For example, pair your ripped denim with a graphic tee and sneakers for laid-back vibes.
- Trendy Layering: Alternatively, layer a cropped hoodie or oversized flannel over your jeans for that street-style look.
- Edgy Chic: To create an edgier vibe, amp up the style with a fitted blazer, bold jewelry, and chunky boots—instant rocker energy!
- Retro Throwback: Go full 80s with a tucked-in band tee, high-tops, and a messy bun.
- Finally, add iron-on patches, colorful embroidery, or even fabric paint around your rips for a unique look.
Style Hack: The more you wear (and personalize) your jeans, the better they’ll look. For endless styling inspiration, check out user-curated boards. Share your creations online and tag your style tribe!
Your Turn to Create!
So there you have it—the complete playbook on how to rip your jeans and get that perfect, white-threaded look. Now that you have a little knowledge about how denim works and the right technique, you can turn any boring old pair of jeans into a personalized statement piece. Indeed, the best part is, no one else will have a pair exactly like yours.
With that in mind, stop reading and start creating! We’d love to see your results. Tag us on social media with your new custom denim!
Want more awesome DIY fashion projects and style guides? Subscribe to our newsletter for exclusive tutorials and tips delivered straight to your inbox!